How To Draw Flames
Yes, I admit. To draw flames may not be so easy. But after you see and learn some simple techniques I am showing here, you will draw whatever flames you like.
We are going to draw 2 simple pictures of flames.
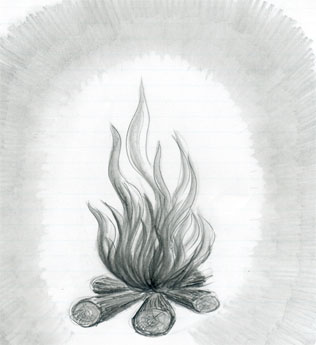
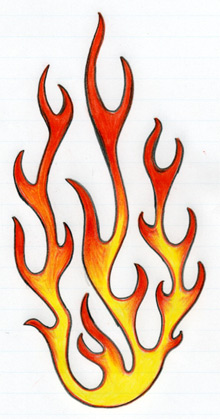
The first drawing is a small campfire that I made only by pencil and the second is a symbolic fire or symbolic flame drawing in color.
Actually, the second one is quite popular.
You can find similar paintings on cars and motorbikes.
It may symbolize heat and speed. It’s a kind of cartoon expression anyway. You are going to love this!
How To Draw Flames
Step By Step
Let’s take a closer look at this picture. Maybe someone told you that to draw flames of a campfire is difficult. Today, you are going to make your own perfect campfire drawing!
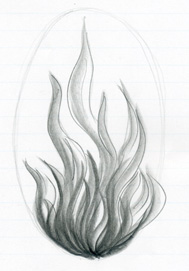
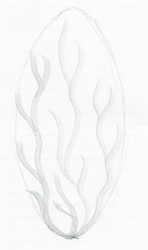
Draw an ellipse. Ellipse represents the size of the flames of fire. Into the same ellipse, draw a couple of flames.
Yes, I know, now these “flames” look rather like seaweeds but just keep on drawing and follow my instructions.
Hold your pencil tilted and draw some shade into the flames.
Here you can add - draw more flames into the picture so it will look more realistic.
Draw again more flames especially on the bottom of the fire. Do this by holding your pencil tilted.
When you draw flames with a pencil, it is good to draw the fire darker in the bottom and lighter towards the top.
I encourage you to use your fantasy and add as many flames as you feel necessary.
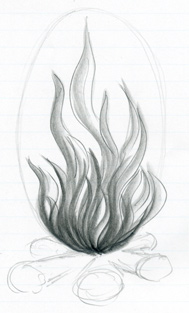
Now make some sharper rough pencil contours of each flame. Draw it like a quick sketch.
Let’s sketch - outline some firewood under the flames. The shapes and size of the wood don’t really matter much, play with it, and use your fantasy.
Work out the firewood so that it looks like wood. Erase the ellipse remaining from the initial drawing.
Now you are ready to add this fire to a little realistic look. A campfire is supposed to be enjoyed at night, so the surroundings are also supposed to be dark.
By slightly tilted pencil, draw a circle of light around the flames, first only by very weak pencil strokes.
The direction of pencil strokes should be oriented out of the fire.
Now just draw more pencil strokes over the previous layer and gradually darken the outer part of the picture. Good! Now, you have not only learned how to draw flames but also how to draw a campfire at night.
Draw Flames for Decoration
These types of flames are quite trendy among car and motorbike lovers. Actually, these flames are much easier to draw than the previous campfire flames.
Again, draw an ellipse. This ellipse is a guideline or guide-ellipse into which you are going to draw the flames.
Hold your pencil tilted and begin to draw simple wider lines as you see in the picture.
Just draw flames - draw more branches on the main flame legs that would fit into the ellipse. You don't need to exactly copy my drawing, but rather try to draw your own fantasy.
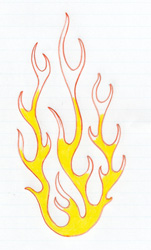
Here you are going to decide the final shape and width of each flame. Simply similarly draw the outline contours as on this picture.
The experiment also with your own creativity if possible.
Gently erase the whole drawing, but not completely. Leave very weak outlines of the flames.
Now, take a red pencil and draw flames again over the formerly erased contours. After you are done, erase all the rest of the pencil lines.
Draw the lower half of the flames in yellow.
The tip of the flames will be in red. Enlarge the picture to see how the red gradually fades into yellow.
Now your drawing looks like real hot flames! You can finish your flames drawing at this point or…
….draw a black pencil contour accent around the flames.
Visitors Personal Gallery Pages
Please see and enjoy the following collection of personal galleries. We all believe you will have a lot of fun. Observing others’ artwork is always, always very inspirational. You may get some new ideas for your own drawings.
|
| |||
Theme Based Visitors Galleries
The following Theme Based Galleries are a collection of selected drawings from various authors based on a certain theme. I would like you to get as much inspiration as possible for your own drawings.
And Now It's Your Turn
SHARE YOUR DRAWINGS
Select The Category and Follow The Uploading Instructions
Share your own drawings, sketches or doodles by choosing a suitable
category below. You will be guided to the uploading process step by
step.
Latest Visitor's Drawings
-
Be your own hero
Nov 09, 24 07:00 AM
Be your own hero. -
Place of tranquility
Nov 03, 24 04:00 AM
Imaginary pens art. Normal ball pens were used except for yellow colour done with a gel ink one. A place of tranquility dominated by nature. Even if in -
Inspired by lake Venna of India
Oct 29, 24 11:32 PM
Here is an imaginary pens art showing the atmosphere of Lake Venna which is located in Maharashtra in India. -
Birds can fly, why can't I?
Oct 29, 24 11:31 PM
Birds can fly, why can't I? -
Boy vs girl, who is the best?
Oct 29, 24 11:30 PM
Just half a girl and half a boy -
Cyclone
Oct 29, 24 11:29 PM
Cyclone -
Imaginary pen art: lake, house and nature
Oct 26, 24 07:51 AM
Two ballpoint pens were used:Nataraj 1.0mm and that of 0.7mm. Dominated by nature, a lake is partly visible on the left and that of a house on the right -
Don't give up, try and try
Oct 19, 24 06:20 AM
Don't give up, try and try. -
Johnny, Mollie and Matt go at a pop party
Oct 18, 24 08:44 PM
This is my drawing of Johnny, Mollie and Matt on Microsoft Paint. 32 year old British man Johnny Mills, his girlfriend/wife Mollie Mills (21 years old) -
Imaginary pens art
Oct 14, 24 05:50 PM
A view on dense forest, with ballpoint pens art. -
no pain no gain
Oct 07, 24 06:55 AM
no pain no gain -
Sorry Mom (by Sana♡,Calcutta)
Sep 28, 24 09:02 PM
Sorry for being a useless child mother..I am trying to be perfect like them..YOU say a ton of hurtful words to me every day..I know it's because you want -
Imaginary pens art
Sep 28, 24 08:49 PM
I have always been fascinated by nature. A place where there is silence and pure air and you can forget your stress for some time. Here is an imaginary -
clock stops time never
Sep 28, 24 08:46 PM
clock stops time never -
Don't beg, sell flowers
Sep 21, 24 11:35 PM
Don't beg, sell flowers.

