How To Draw Cartoon Bird
Let’s learn how to draw cartoon bird - few, easy to follow, and quick, simple steps. I really hope you will like this tweeting birdie. As you follow this tutorial, you will learn the basic steps of how to construct the bird’s body.
The drawing sequence or process is very similar to other cartoon characters. Almost always begins with circles, ellipses, or noodle-like shapes, etc. If you had difficulties drawing cartoons or other drawings, then this system may help you a lot.
You can use this system to construct virtually any kind of figure, regardless of whether it is an animal or human being. Compared to a realistic bird drawing, this cute character is a very easy task. Before you begin, observe this birdie a little. Notice the body proportions, the size of its head and the body, position of the wings, tail, etc.
Let's Draw Cartoon Bird
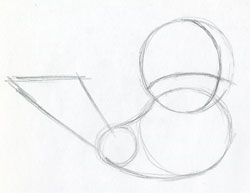
Draw three circles as you see in this picture. Possibly in the same or similar size and position. Two big circles represent the head and the belly – the body of the bird and the smallest circle is the tail part.
Notice that these two big circles are almost identical. Use your free hand, don’t use a compass! This is a cartoon, not a photo. Remember that you are an artist, even if you may not feel so yet :) Practicing will make you a good artist :)
Use your pencil gently, do not push too hard. You are drawing the initial pencil lines that you will erase later.
Draw two perspective guidelines over the head circle as you see in this picture. The horizontal guideline helps you to correctly set the eyes. The crossing point of vertical and horizontal lines will be the place for the beak.
Join the belly and the tail circle with two slightly curved pencil lines. Outline the tail feathers. Your cartoon bird now gradually starts to emerge.
Draw the eye circles above the horizontal guideline as you see in the picture. Actually, they look more like half circles because cheeks overlap them.
Outline the cheeks and the beak. Notice that the beak is now only like a symbol, we shall modify it later. Draw the contours of the wings.
Draw both legs and the branch on which this bird is sitting.
Now, you can start to gradually erase unnecessary guidelines. Observe the picture well and do it. This should be an easy task. When erasing pencil guidelines on narrow places use a pencil-type-eraser.
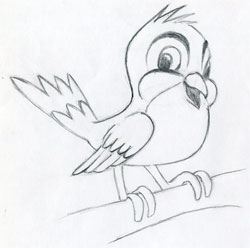
Outline the feathers on the tail and the wings as you see in the picture.
Now you can add a couple of feathers on the top of the head. These will create a cute-looking accent for your cartoon bird. Actually, here you can make a test. First, draw the bird without these feathers and then add the feathers. Compare which version looks better.
Work out the eyes, the cheeks, and the beak. Erase the rest of the pencil dust over the entire body. Now, the contours should look clear and distinct.
Shade the body of your bird as you see in the picture. A large circle around the eyes, the cheeks, and the belly should remain white or brighter than the rest of the body. Darken the end of the wings and the tail feathers.
Did You Enjoy Drawing Cartoon Bird?
Check Out Also These Cartoon Drawing Tutorials:
Visitors’ Personal Gallery Pages
Enjoy the collection of personal galleries below.
Observing others’ artwork is always inspiring and might spark new ideas for your own creations.
We believe you’ll have a lot of fun exploring these pages!
|
| |||
Theme Based Visitors Galleries
The following Theme Based Galleries are a collection of selected drawings from various authors based on a certain theme. I would like you to get as much inspiration as possible for your own drawings.
SHARE YOUR DRAWINGS
Select The Category and Follow The Uploading Instructions
Share your own drawings, sketches or doodles by choosing a suitable
category below. You will be guided to the uploading process step by
step.
Latest Visitor's Drawings
-
You got mail
Dec 13, 24 05:52 PM
I really been enjoying trying new things. This is acrylic paint on an old saw blade. I have not posted in a while so I will be sharing more soon -
Imaginary pen art completed
Dec 12, 24 05:44 AM
As for handleterring of NATURE and the decor,brillant pens were used.And it is good for this style.So here is an imaginary pens art and as usual,dominated -
Still in progress
Dec 08, 24 05:25 AM
Ballpoint pens art. Imaginary. -
Respect others for self-protection...
Dec 07, 24 07:59 PM
Respect others for self-protection... -
Thieves are always punished
Dec 07, 24 07:57 PM
Thieves are always punished. -
carnivorous plant
Nov 25, 24 08:02 AM
carnivorous plant -
Imaginary pens art in progress
Nov 25, 24 07:59 AM
Dominated by colourful nature and focus on details. -
Chateau Trompette in Mauritius
Nov 25, 24 07:57 AM
Maybe this colonial mansion is not known to many, in Mauritius. Or maybe of all those who saw it, very few are aware that it is known as Chateau Trompette. -
Understand your own value
Nov 25, 24 07:55 AM
Understand your own value -
Be your own hero
Nov 09, 24 07:00 AM
Be your own hero. -
Place of tranquility
Nov 03, 24 04:00 AM
Imaginary pens art. Normal ball pens were used except for yellow colour done with a gel ink one. A place of tranquility dominated by nature. Even if in -
Inspired by lake Venna of India
Oct 29, 24 11:32 PM
Here is an imaginary pens art showing the atmosphere of Lake Venna which is located in Maharashtra in India. -
Birds can fly, why can't I?
Oct 29, 24 11:31 PM
Birds can fly, why can't I? -
Boy vs girl, who is the best?
Oct 29, 24 11:30 PM
Just half a girl and half a boy -
Cyclone
Oct 29, 24 11:29 PM
Cyclone
