How To Draw Angel Wings
Want to make a collage of some other beautiful piece of artwork? How to draw angel wings will be an indispensable skill that will save you a lot of time.
It is a fantastic thing that today with all the available information, technology, and tools we can create virtually any kind of professionally-looking artwork at home, or make a hand-made book, etc.
I know for sure that once you have learned how to draw angel wings, you’ll be able to draw any type of angel wings or create your own original.
The variations are infinite and you are limited only by your fantasy.
If you have a chance, look at the old master's paintings of angels and you’ll quickly find that the angel wings are often painted or drawn in different shapes and sizes.
Guardian angels, Archangels, or other Divine Authorities have large long feathered wings while other angels are illustrated as curly-haired children with small cute wings.
Angel of Love – Cupid is a very good example of that.
I am going to show you a basic procedure of how to draw angel wings. The following illustration is maybe one of the most common angel wing drawing.
The point is to learn the drawing process, step-by-step so that you can make your own variations as you like. It is very simple and won’t take you more than a couple of minutes to complete it, once you learn this basic sequence.
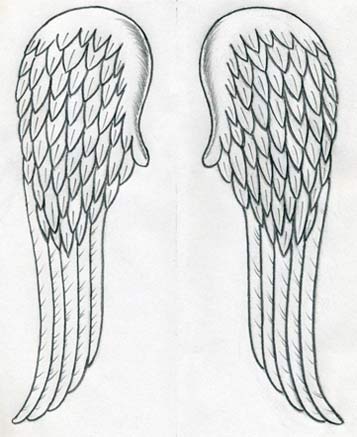
This picture is a completed drawing of angel wings. Click on the picture to see it in its full size and observe how simple that really is. If necessary print it out.
Sketch a very rough outline of one wing. Use a tilted soft pencil to better control the strokes.
How To Draw Angel Wings
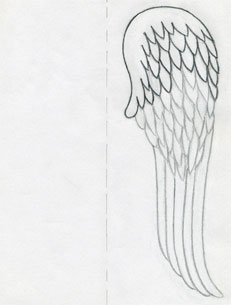
Fold the paper half and make a weak pencil line on the folded vertical line. This line is the middle line between the right and left-wing. It will ease the drawing incredibly.
Now, observe the complete drawing and decide the total shape and size of one of the wings – right or left – depends which one you are going to start with.
Tilt the pencil and possibly draw by one side of the graphite to achieve a wider touch on the paper. I emphasize this important way of sketching almost on every page because it may tremendously ease the initial steps.
Notice how the wings are divided into 2 sections. The upper part is shaped like a tear where the most of short feathers are concentrated. To draw angel wings is pretty much similar to drawing the wings of a bird.
The only difference may be that angel wings authors often put some fantasy into the shape, size of the wings, and feathers, which is perfectly OK in this case.
Sketch the spiky ends of feathers. They look like piled on each other and, in fact, they are. Leave the prolonged lower area blank now.
Add the long feather lines into the prolonged lower area. Keep everything just approximate at this stage. We shall refine on gradually.
It’s time to use pen-shaped-eraser. First, start to erase the excess outer silhouette lines as necessary. This step will give you a clearer shape of the angel wings.
Continue erasing the excess pencil lines and blurs on the entire drawing. Outline the final shape – ending of the long wings that are harmoniously streaming into each other.
Do it similar or better. Make additional corrections by pencil where the lines were erased so that you have exact and sharp-looking outlines.
Here I would recommend a softer 2B pencil because you need to really darken the outlines on every single feather on your angel wing drawing.
This is necessary because we are going to use the vertical line which you have created in the first step of this sequence to fold the paper and imprint the wing on the opposite side of the paper.
When you have darkened - highlighted the outlines on all feathers by 2B soft pencil, fold the paper half and gently push the face of the drawing to the opposite side of the paper.
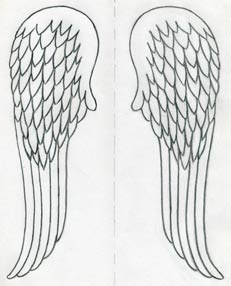
When you are done, your imprint should look like this.
Make sure the paper will not move while imprinting. By the nails on your fingers push and slide your nails on the paper applying pressure so that the dark soft pencil outlines will imprint on the opposite half of the paper.
This simple technique will ensure that you do not need to draw angel wings on both sides separately and will get an exact mirror imprint effortlessly.
This is very simple. Draw stronger pencil lines over the imprinted lines.
You are almost ready. The very last step is to mark out the middle part of the feathers and to make short strokes on long feathers here and there.
Finally – but not necessary – you can put a slight shade on the upper curved part of the angel wings. Very Good!
This was one of the most common drawings of angel wings. You have learned the basic procedure and can make now your own drawings that I believe will be much better than this one…;-)
Visitors’ Personal Gallery Pages
Enjoy the collection of personal galleries below.
Observing others’ artwork is always inspiring and might spark new ideas for your own creations.
We believe you’ll have a lot of fun exploring these pages!
|
| |||
Theme Based Visitors Galleries
The following Theme Based Galleries are a collection of selected drawings from various authors based on a certain theme. I would like you to get as much inspiration as possible for your own drawings.
SHARE YOUR DRAWINGS
Select The Category and Follow The Uploading Instructions
Share your own drawings, sketches or doodles by choosing a suitable
category below. You will be guided to the uploading process step by
step.
Latest Visitor's Drawings
-
You got mail
Dec 13, 24 05:52 PM
I really been enjoying trying new things. This is acrylic paint on an old saw blade. I have not posted in a while so I will be sharing more soon -
Imaginary pen art completed
Dec 12, 24 05:44 AM
As for handleterring of NATURE and the decor,brillant pens were used.And it is good for this style.So here is an imaginary pens art and as usual,dominated -
Still in progress
Dec 08, 24 05:25 AM
Ballpoint pens art. Imaginary. -
Respect others for self-protection...
Dec 07, 24 07:59 PM
Respect others for self-protection... -
Thieves are always punished
Dec 07, 24 07:57 PM
Thieves are always punished. -
carnivorous plant
Nov 25, 24 08:02 AM
carnivorous plant -
Imaginary pens art in progress
Nov 25, 24 07:59 AM
Dominated by colourful nature and focus on details. -
Chateau Trompette in Mauritius
Nov 25, 24 07:57 AM
Maybe this colonial mansion is not known to many, in Mauritius. Or maybe of all those who saw it, very few are aware that it is known as Chateau Trompette. -
Understand your own value
Nov 25, 24 07:55 AM
Understand your own value -
Be your own hero
Nov 09, 24 07:00 AM
Be your own hero. -
Place of tranquility
Nov 03, 24 04:00 AM
Imaginary pens art. Normal ball pens were used except for yellow colour done with a gel ink one. A place of tranquility dominated by nature. Even if in -
Inspired by lake Venna of India
Oct 29, 24 11:32 PM
Here is an imaginary pens art showing the atmosphere of Lake Venna which is located in Maharashtra in India. -
Birds can fly, why can't I?
Oct 29, 24 11:31 PM
Birds can fly, why can't I? -
Boy vs girl, who is the best?
Oct 29, 24 11:30 PM
Just half a girl and half a boy -
Cyclone
Oct 29, 24 11:29 PM
Cyclone

