How to Draw Cartoon Lion
Drawing a cartoon lion or realistic lion may be a challenge for many of us. But it can be done easily following this tutorial.
I tried to make this task easier and create a tutorial that you can easily follow.
Almost all cartoon characters are created by the combination of circles, ellipses, noodles, or pear shapes.
I applied the same technique here.
As you see this lion is sitting. So the drawing sequence corresponds to its body position.
I recommend drawing the very first steps in this tutorial the same as you see here because these ellipses and circles will determine the lion’s size and posture.
Cartoon Lion Step By Step
Draw two ellipses as you see in the picture. The upper one is the lion’s head and the lower is the lion’s chest. Draw them in the same position as here. Notice that the chest ellipse is positioned a little on the left.
On the upper ellipse draw two perspective guidelines. The small circle below is the lion’s rump. When you observe real lions you’ll understand that lions have huge chests but small rumps.
Enlarge the picture and you’ll notice that the pencil lines are rather rough. That is OK for now. You can make it the same or similar; we shall erase all unnecessary pencil lines later.
Join the chest ellipse and the rump circle with slightly curved lines as you see in this picture. Draw a straight line – as if piercing into the crossing point of perspective guidelines on the head.
This is the axis and it will help you to correctly position the lion’s nose. The point where horizontal and vertical axis lines cross is the lion’s nose as you will see in the next picture.
Draw the nose and the muzzle (mouth) part of the cartoon lion as you see in the picture. You can also join the neck and head circle by a curved line. Later, the lion’s mane will cover the neckline so it will not be visible.
Draw all four legs in a sitting position as you see in the picture. This should be very easy. Just approximate lines will be OK now, so don’t need to make it look very precise yet.
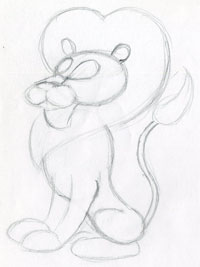
Draw the ears. Add the chin – lion’s beard and outline the lion’s mane. Notice it the mane has a heart-like shape. The lower part of the mane ends approximately in the middle of the lion’s chest. Outline the contours of the tail.
Let’s work out some parts on the head and the face. You can now begin to erase some of the unnecessary pencil guidelines. Draw the eye circles; notice that these are continuous lines coming from the lion’s nose.
You can gradually erase all the rest of the initial pencil guidelines so that your drawing should look something like this.
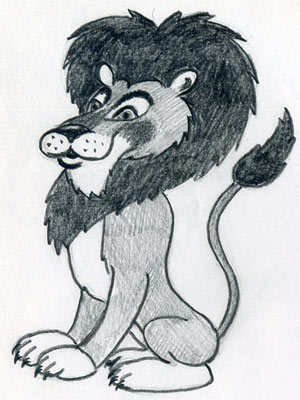
It is good if you have a softer pencil handy, like B4 or B6 to outline the dark contours of the entire body. Do it now, as you see in this picture. Draw the eyes, darken the nose and outline the fingers on the lion’s paws.
If the standard eraser is too clumsy then I recommend using a pencil-type-eraser so that you can erase narrow places too.
Color the body as you see in this picture. You can do it using only a graphite pencil or you can make it using colored pencils too. When you finished coloring the entire body don’t forget to draw the claws.
Did You Enjoy Drawing Cartoon Lion?
Check Out Also These Cartoon Drawing Tutorials:
Visitors’ Personal Gallery Pages
Enjoy the collection of personal galleries below.
Observing others’ artwork is always inspiring and might spark new ideas for your own creations.
We believe you’ll have a lot of fun exploring these pages!
|
| |||
Theme Based Visitors Galleries
The following Theme Based Galleries are a collection of selected drawings from various authors based on a certain theme. I would like you to get as much inspiration as possible for your own drawings.
SHARE YOUR DRAWINGS
Select The Category and Follow The Uploading Instructions
Share your own drawings, sketches or doodles by choosing a suitable
category below. You will be guided to the uploading process step by
step.
Latest Visitor's Drawings
-
You got mail
Dec 13, 24 05:52 PM
I really been enjoying trying new things. This is acrylic paint on an old saw blade. I have not posted in a while so I will be sharing more soon -
Imaginary pen art completed
Dec 12, 24 05:44 AM
As for handleterring of NATURE and the decor,brillant pens were used.And it is good for this style.So here is an imaginary pens art and as usual,dominated -
Still in progress
Dec 08, 24 05:25 AM
Ballpoint pens art. Imaginary. -
Respect others for self-protection...
Dec 07, 24 07:59 PM
Respect others for self-protection... -
Thieves are always punished
Dec 07, 24 07:57 PM
Thieves are always punished. -
carnivorous plant
Nov 25, 24 08:02 AM
carnivorous plant -
Imaginary pens art in progress
Nov 25, 24 07:59 AM
Dominated by colourful nature and focus on details. -
Chateau Trompette in Mauritius
Nov 25, 24 07:57 AM
Maybe this colonial mansion is not known to many, in Mauritius. Or maybe of all those who saw it, very few are aware that it is known as Chateau Trompette. -
Understand your own value
Nov 25, 24 07:55 AM
Understand your own value -
Be your own hero
Nov 09, 24 07:00 AM
Be your own hero. -
Place of tranquility
Nov 03, 24 04:00 AM
Imaginary pens art. Normal ball pens were used except for yellow colour done with a gel ink one. A place of tranquility dominated by nature. Even if in -
Inspired by lake Venna of India
Oct 29, 24 11:32 PM
Here is an imaginary pens art showing the atmosphere of Lake Venna which is located in Maharashtra in India. -
Birds can fly, why can't I?
Oct 29, 24 11:31 PM
Birds can fly, why can't I? -
Boy vs girl, who is the best?
Oct 29, 24 11:30 PM
Just half a girl and half a boy -
Cyclone
Oct 29, 24 11:29 PM
Cyclone

