How To Draw A Camel
Let’s learn how to draw a camel. I made this drawing as easy as possible. You will see in this tutorial that the steps are really doable even for an absolute beginner. Enlarge each drawing in the sequence below and you will see very clearly how simple it is.
You can draw this cute camel only in graphite pencil or make it till the end of the tutorial and color it.
I always say that drawing animals is often a bit complicated job...but, you will enjoy this – how to draw a camel - tutorial because it really IS very simple.
Maybe it is because of the long legs and a little odd-looking body…I guess. Apart from that, camels are indispensable for people living in the desert.
As you certainly know, currently there are two surviving species of camels: one-humped camel AKA Dromedary Camel and two-humped camel AKA Bactrian Camel.
Today, you will learn how to draw a one-humped - Dromedary Camel.
Go ahead, click on the picture to enlarge it, and observe the size of the body, posture, length of camel’s legs, neck, etc.
Let's Learn How To Draw A Camel
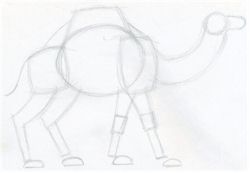
The first sketch is hard to describe, but each part represents a part of Camel’s body. The middle egg-like shape is the belly, the smaller rectangle is the camel’s hip (butt) and the larger rectangle is the chest.
Sketch these three shapes approximately the same as you see in the picture. If you are unsure, check out the next step in the sequence, which should give you a hint, how to sketch these three things.
You can roughly outline the hump; just make it square-like shaped, we shall round it later.
Sketch the upper part of all four legs and outline the neck.
Now we are getting really closer to the (almost) final shape of the Camel’s body. This third step should give you an idea of how to draw a camel very roughly.
Complete the lower part of all four legs as you see in the picture. Do it very roughly, make only very light pencil lines because you will need to erase some of them later.
Notice that the shape of all legs looks square-shaped, it is OK, we will make them round later. All four feet are only a kind of half-ellipses. Do it similarly as you see in this picture.
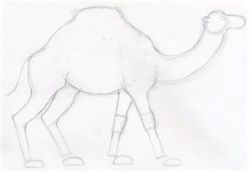
Sketch the camel’s head. Notice that the head is sketched only as a single circle and the muzzle is an ellipse-like shape.
We can now gradually erase the unnecessary pencil sketch lines. It is very convenient to use a pencil type eraser, if you have one.
You can start to join every part of the Camel’s body, and gradually create a nice and round silhouette as you see in the picture.
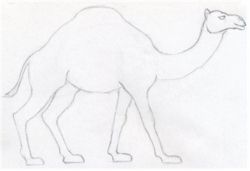
Continue joining each body part and make the body silhouette look round and natural. Outline the legs and the tail.
Notice, that here I made one slight correction, I have changed the direction of the ears.
Finish the silhouette outline of the entire body. It should look similar as on this picture or possibly better.
Now let’s take a look at the detail on Camel’s head. Outline the muzzle, the eyes, the nose in a similar fashion as in this picture.
Make sure that even the final pencil lines are rather weaker, i.e. do not push the pencil too hard.
From this point on, we are going to color it. Take a light brown pencil and by a single line draw the whole silhouette of the body. Draw it over the original graphite pencil line.
When you are done, take an eraser and erase all graphite pencil lines. You may also erase some colored pencil lines by mistake too, but it is OK, just draw them again in the same place.
Your camel should look now like a real camel. You have successfully learned how to draw a camel. From here the rest is just a coloring page work, but I suggest you do it till the end.
Using a light brown color pencil, color out flat the whole body. No shading yet! Just plain brown color all over the body with the same or similar intensity.
If you would like to shade the body of your camel better than this one, Google out some images of camels, and you will get the idea, or you can just follow me here.
Take a darker brown color pencil and begin shading the body parts as you see in the picture. The reason I told you to Google some photos is because of this. Seeing an actual photo is very important.
Generally, parts under the belly should be darker than those on the upper parts.
When you have finished the coloring you can finish the camel’s head. Enlarge the picture and observe the details, the nose, muzzle, eyes, ears, etc.
This camel has a smiling expression, but camels generally look like this. The shape of their mouth makes an impression of a smiling face. When you have finished the coloring you can finish the camel’s head.
Enlarge the picture and observe the details, the nose, muzzle, eyes,
ears, etc.
This camel has a smiling expression, but camels generally look like
this. The shape of their mouth makes an impression of a smiling face.
Did You Enjoy Drawing a Camel?
Check Out Also These Animal Drawing Tutorials:
Visitors’ Personal Gallery Pages
Enjoy the collection of personal galleries below.
Observing others’ artwork is always inspiring and might spark new ideas for your own creations.
We believe you’ll have a lot of fun exploring these pages!
|
| |||
Theme Based Visitors Galleries
The following Theme Based Galleries are a collection of selected drawings from various authors based on a certain theme. I would like you to get as much inspiration as possible for your own drawings.
SHARE YOUR DRAWINGS
Select The Category and Follow The Uploading Instructions
Share your own drawings, sketches or doodles by choosing a suitable
category below. You will be guided to the uploading process step by
step.
Latest Visitor's Drawings
-
You got mail
Dec 13, 24 05:52 PM
I really been enjoying trying new things. This is acrylic paint on an old saw blade. I have not posted in a while so I will be sharing more soon -
Imaginary pen art completed
Dec 12, 24 05:44 AM
As for handleterring of NATURE and the decor,brillant pens were used.And it is good for this style.So here is an imaginary pens art and as usual,dominated -
Still in progress
Dec 08, 24 05:25 AM
Ballpoint pens art. Imaginary. -
Respect others for self-protection...
Dec 07, 24 07:59 PM
Respect others for self-protection... -
Thieves are always punished
Dec 07, 24 07:57 PM
Thieves are always punished. -
carnivorous plant
Nov 25, 24 08:02 AM
carnivorous plant -
Imaginary pens art in progress
Nov 25, 24 07:59 AM
Dominated by colourful nature and focus on details. -
Chateau Trompette in Mauritius
Nov 25, 24 07:57 AM
Maybe this colonial mansion is not known to many, in Mauritius. Or maybe of all those who saw it, very few are aware that it is known as Chateau Trompette. -
Understand your own value
Nov 25, 24 07:55 AM
Understand your own value -
Be your own hero
Nov 09, 24 07:00 AM
Be your own hero. -
Place of tranquility
Nov 03, 24 04:00 AM
Imaginary pens art. Normal ball pens were used except for yellow colour done with a gel ink one. A place of tranquility dominated by nature. Even if in -
Inspired by lake Venna of India
Oct 29, 24 11:32 PM
Here is an imaginary pens art showing the atmosphere of Lake Venna which is located in Maharashtra in India. -
Birds can fly, why can't I?
Oct 29, 24 11:31 PM
Birds can fly, why can't I? -
Boy vs girl, who is the best?
Oct 29, 24 11:30 PM
Just half a girl and half a boy -
Cyclone
Oct 29, 24 11:29 PM
Cyclone


