How to Draw Manga Eyes
To draw manga eyes is easier than you have ever imagined and, you’ll soon see why. The character or personality of any human face (this includes manga or comics) is determined mostly by our eyes. If you change slightly the eyes, the impression of that character changes instantly.
Before you start to draw a complete manga human figure, it is good if you practice individual parts first.
Let’s start from the head and face. Since every character’s individuality is determined by eyes, the best idea would be then to start with eyes.
Variations on manga eyes are virtually infinite, as many as you can imagine. When you learn the basic “recipe” of how to draw manga eyes – I promise, you’ll learn it in no time - you will be able to create your own variations of manga eyes as you wish.
A fictitious manga character whether is it about eyes or the whole body is always a product of our – your - imagination. It means that you can draw freely whatever shape or size you like and need not be afraid “not to be accurate”. Your creation will always be the perfect one because it is the first and, it is the original.
Simple Drawing of A Human Eye

This is a simple drawing of the human eye. I put this picture first so that you can compare the differences between manga-eyes-below) and simple human eye drawing. You can almost tell from the shape and roundness that it looks like a female eye.
Let's Draw Manga Eyes

Compared to the first drawing, this looks more like a male’s eye. It radiates out maybe a bit of anger, and that is why the shape is rather angular. When you compare to the above simple human eye drawing you’ll easily notice the simplified features. And, that is what manga eyes are about.
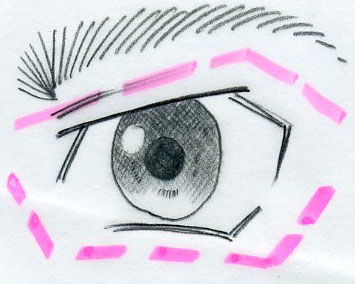
While the real human eye’s contour resembles a shell-like shape, especially the eyes of children and females this one has rather sharper angular contours, so it should fit well with a male character.
Drawing Manga Eyes
Step By Step
Here is an example of how to draw eyes in an easy step-by-step sequence. Take whatever paper you have – yes, the back of the envelope will serve the purpose perfectly. Take a pen or pencil and do this exercise first. Do it now.
Don’t make too much preparation, like selecting the right pencil, the right paper/notebook, the right light, the right daytime, the right mood…or the right whatever, because it is seldom right.
We are often stacked in too much unnecessary preparation that literally keeps us idle.

1) Begin to draw with the outlines of eyelid first.

2) It does not really matter what angles you decide because it will be your original, so take your time and be easy about it. If possible avoid using the eraser. If you made a mistake or do not feel satisfied with the shape, draw over the previous line.

3) You can observe the proportions and lines as on the picture and try to keep the same shapes but it is perfectly OK if your sketch does not resemble this one.

4) Draw a (not exactly) round circle of the iris. Notice that in most cases the upper part of the iris is almost always hidden under the upper eyelid. See your own eyes in the mirror.

5) Approximately into the middle of the iris draw a round circle of the pupil and, one smaller circle next to it, diagonally up above. This circle is the reflection of the light. You’ll see in a moment why it is important.
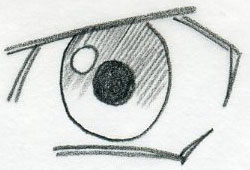
6) Now, shade the pupil, starting from the top. The upper part of the pupil is darker, it helps to create an image of 3-dimensionality.
7) Shade the pupil by crosshatching, leave the second smaller circle white and add several short strokes spinning around the pupil. Draw a simple eyebrow so that the picture looks complete.
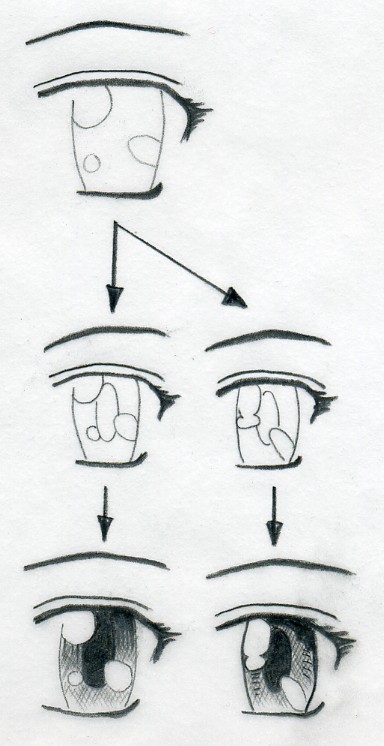
How To Draw Manga Eyes Compact Guide
The following compact guide needs not any commentary. Simply follow the sequence as you see in the picture.


Visitors’ Personal Gallery Pages
Enjoy the collection of personal galleries below.
Observing others’ artwork is always inspiring and might spark new ideas for your own creations.
We believe you’ll have a lot of fun exploring these pages!
|
| |||
Theme Based Visitors Galleries
The following Theme Based Galleries are a collection of selected drawings from various authors based on a certain theme. I would like you to get as much inspiration as possible for your own drawings.
SHARE YOUR DRAWINGS
Select The Category and Follow The Uploading Instructions
Share your own drawings, sketches or doodles by choosing a suitable
category below. You will be guided to the uploading process step by
step.
- Home ›
- Draw Manga ›
- Manga Eyes
Latest Visitor's Drawings
-
You got mail
Dec 13, 24 05:52 PM
I really been enjoying trying new things. This is acrylic paint on an old saw blade. I have not posted in a while so I will be sharing more soon -
Imaginary pen art completed
Dec 12, 24 05:44 AM
As for handleterring of NATURE and the decor,brillant pens were used.And it is good for this style.So here is an imaginary pens art and as usual,dominated -
Still in progress
Dec 08, 24 05:25 AM
Ballpoint pens art. Imaginary. -
Respect others for self-protection...
Dec 07, 24 07:59 PM
Respect others for self-protection... -
Thieves are always punished
Dec 07, 24 07:57 PM
Thieves are always punished. -
carnivorous plant
Nov 25, 24 08:02 AM
carnivorous plant -
Imaginary pens art in progress
Nov 25, 24 07:59 AM
Dominated by colourful nature and focus on details. -
Chateau Trompette in Mauritius
Nov 25, 24 07:57 AM
Maybe this colonial mansion is not known to many, in Mauritius. Or maybe of all those who saw it, very few are aware that it is known as Chateau Trompette. -
Understand your own value
Nov 25, 24 07:55 AM
Understand your own value -
Be your own hero
Nov 09, 24 07:00 AM
Be your own hero. -
Place of tranquility
Nov 03, 24 04:00 AM
Imaginary pens art. Normal ball pens were used except for yellow colour done with a gel ink one. A place of tranquility dominated by nature. Even if in -
Inspired by lake Venna of India
Oct 29, 24 11:32 PM
Here is an imaginary pens art showing the atmosphere of Lake Venna which is located in Maharashtra in India. -
Birds can fly, why can't I?
Oct 29, 24 11:31 PM
Birds can fly, why can't I? -
Boy vs girl, who is the best?
Oct 29, 24 11:30 PM
Just half a girl and half a boy -
Cyclone
Oct 29, 24 11:29 PM
Cyclone


