How To Draw A Mouse
Every child would love to know how to draw a mouse. And I guess grown-ups too. A Mouse is maybe one of the most common so-called mini animals that have been living with humans for ages. No wonder that Walt Disney created the iconic character of Mickey Mouse which became an evergreen character, kinda "mouse of all mouses".
Today we will learn how to draw a mouse in a few simple and very easy-to-follow steps. Any beginner can follow this drawing manual without even experiencing any hardships or challenges.
Just get a pencil a begin to draw. It does not really matter whether you draw correct shapes on your first try or not. Just do it. The important thing is the action.
Draw A Mouse Step by Step
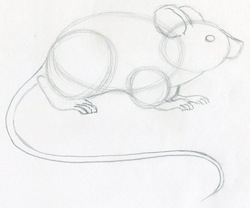
Sketch two similar ellipses as you see in the picture. It is OK if you make mistake, just erase the wrong strokes and re-draw the ellipse shapes. These two ellipses are the body and the head of the mouse.
Add two more circle-like shapes. These will be the legs. On the front part of the head ellipse sketch the nose. We are assembling the mouse body piece by piece. When you learn this simple technique you will not only learn how to draw a mouse but literally any animal you like.
This sketch looks a bit as if we are about to draw a piglet.
Add the eyes and the ears. Sketch these parts approximately in the same or similar position as you see in the picture.
By curvy loose line joins the lower part of the neck and the belly - the part between the front and hind legs.
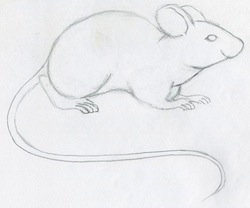
Sketch the mouse's feet, similarly as you see in the picture. Sketch the tail. Be careful with the length of the tail, try to keep the length balance with the body. Now you have read the basic outline of the mouse's body, almost complete.
Let's erase the sketch guidelines. First, observe this picture and do it similarly. When you erase all unnecessary pencil lines, draw a nice and clear contour of the mouse body so that you get a similar shape to this one. So far, you've mastered how to draw a mouse - I mean the very basic shape.
I would recommend, to RE-DRAW the whole process from the beginning till here again. Then you can show your skill to others, they will be amazed to see how easy the whole drawing process really is.
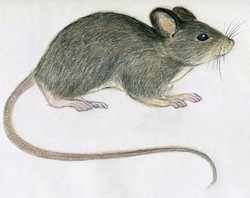
From this stage on, we are going to add color. Take a light brown pencil and pink color pencil. Let's start the coloring process from the feet first. Over the graphite pencil lines, draw a light pink contour of the mouse's feet as you see in the picture. Push the pencil gently!
Then, do the same with a light brown color pencil over the graphite pencil lines and draw a clear brown color contour of the mouse's body.
Now, take an eraser and erase the remaining graphite pencil lines so that you get a similar outline as in this picture.
Now, make a small circle on the mouse's eye as you see in the picture, this circle will remain white - uncolored.
Then color the rest with a black color pencil (not graphite pencil). The small white dot on the mouse's eye is a reflection of light and it makes the whole drawing look more realistic.
You've probably noticed that here and there we have to pay special attention to tiny details because details are very important. Not only when you draw a mouse but when you draw any living creature.
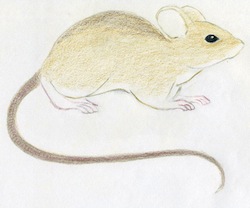
With light brown color pencil color the whole mouse's body, except the feet and the lower part of the neck, belly, and ears. No shading just plain light brown color. The same goes with the feet. The color theme is in light pink color, but really very very lightly!
The tail: first color it all in pink color, very lightly and over the pink color add light brown as you see on the picture. This will be the basic coloring.
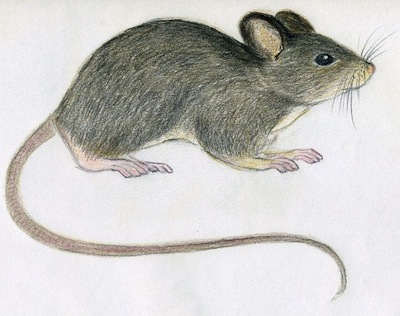
By observing the picture, go ahead and begin adding another layer of darker brown color on the mouse's body. make short strokes to create a fur-like look.
Keep on refining the details on each part of the mouse's body. Observe first and then add color as necessary. Be careful with the parts that are whiter, like inside the ears, underbelly, under the neck, etc. Refine the colors as necessary, add the whiskers and other details. Good, now you've learned how to draw a mouse.
Did You Enjoy Drawing Mouse?
Check Out Also These Animal Drawing Tutorials:
Visitors Personal Gallery Pages
Please see and enjoy the following collection of personal galleries. We all believe you will have a lot of fun. Observing others’ artwork is always, always very inspirational. You may get some new ideas for your own drawings.
|
| |||
Theme Based Visitors Galleries
The following Theme Based Galleries are a collection of selected drawings from various authors based on a certain theme. I would like you to get as much inspiration as possible for your own drawings.
And Now It's Your Turn
SHARE YOUR DRAWINGS
Select The Category and Follow The Uploading Instructions
Share your own drawings, sketches or doodles by choosing a suitable
category below. You will be guided to the uploading process step by
step.
Latest Visitor's Drawings
-
Be your own hero
Nov 09, 24 07:00 AM
Be your own hero. -
Place of tranquility
Nov 03, 24 04:00 AM
Imaginary pens art. Normal ball pens were used except for yellow colour done with a gel ink one. A place of tranquility dominated by nature. Even if in -
Inspired by lake Venna of India
Oct 29, 24 11:32 PM
Here is an imaginary pens art showing the atmosphere of Lake Venna which is located in Maharashtra in India. -
Birds can fly, why can't I?
Oct 29, 24 11:31 PM
Birds can fly, why can't I? -
Boy vs girl, who is the best?
Oct 29, 24 11:30 PM
Just half a girl and half a boy -
Cyclone
Oct 29, 24 11:29 PM
Cyclone -
Imaginary pen art: lake, house and nature
Oct 26, 24 07:51 AM
Two ballpoint pens were used:Nataraj 1.0mm and that of 0.7mm. Dominated by nature, a lake is partly visible on the left and that of a house on the right -
Don't give up, try and try
Oct 19, 24 06:20 AM
Don't give up, try and try. -
Johnny, Mollie and Matt go at a pop party
Oct 18, 24 08:44 PM
This is my drawing of Johnny, Mollie and Matt on Microsoft Paint. 32 year old British man Johnny Mills, his girlfriend/wife Mollie Mills (21 years old) -
Imaginary pens art
Oct 14, 24 05:50 PM
A view on dense forest, with ballpoint pens art. -
no pain no gain
Oct 07, 24 06:55 AM
no pain no gain -
Sorry Mom (by Sana♡,Calcutta)
Sep 28, 24 09:02 PM
Sorry for being a useless child mother..I am trying to be perfect like them..YOU say a ton of hurtful words to me every day..I know it's because you want -
Imaginary pens art
Sep 28, 24 08:49 PM
I have always been fascinated by nature. A place where there is silence and pure air and you can forget your stress for some time. Here is an imaginary -
clock stops time never
Sep 28, 24 08:46 PM
clock stops time never -
Don't beg, sell flowers
Sep 21, 24 11:35 PM
Don't beg, sell flowers.

